

Electronics Listings
5502 items found
JB Kitchens Baths & Design, Inc.
Milwaukee Underground Productions - Your Premier Wedding DJ Service for Southeastern Wisconsin! <br> <br>Choose Milwaukee Underground Productions as your premier Wedding DJ Service in Southeastern Wisconsin. Our service area includes Milwaukee, Milwaukee County, Waukesha County, Ozaukee County, Washington County, Racine County, Kenosha County, Walworth County, Jefferson County, and Dodge County. We're conveniently located at 2210 10th Ave Suite 202, South Milwaukee, WI, USA, and we're here to make your wedding unforgettable. <br> <br>Selecting the right DJ is crucial, and we understand the significance of this decision. Our team of experienced and personable DJs is dedicated to providing exceptional customer service. You have the option to meet your DJ before booking to ensure the perfect match for your event. If you're uncertain, our experts can guide you in selecting the ideal DJ based on your preferences. <br> <br>Introducing our NEW Client Portal, designed to simplify and expedite the booking process. With the portal, you can quickly create a custom DJ quote, sign your DJ contract, and submit your music and timeline template—all within minutes. Booking a Wedding DJ with us is swift and efficient, allowing you to focus on other aspects of your wedding planning. Plus, we offer optional enhancements like Photo Booth and Room Lighting to enhance your celebration. <br> <br>Our comprehensive DJ services include custom music curation, song requests, DJ lighting, wireless microphones, MC services, and a state-of-the-art sound system. We take pride in crafting a playlist that will keep your guests dancing and having a fantastic time. <br> <br>Here's a heartfelt testimonial from one of our satisfied clients: <br> <br>Chris at Milwaukee Underground Productions was so wonderful to work with for our wedding! From our very first meeting, we could tell that he was genuine and invested in us, and that caring quality translated throughout the process. Both being music majors, we had pretty specific music requests that he accommodated without hesitation. All our guests raved (and continue to comment on!) our DJ and how much fun the dance was. I would HIGHLY recommend Milwaukee Underground Productions for any event!" - Jennifer G, October 1, 2021, Wedding DJ Service <br>We're excited to discuss your special event and make it truly unforgettable. Contact us today to discover why we're the top choice for Wedding DJ services in Southeastern Wisconsin! <br> <br>#Contact Us:- <br> <br>JB Kitchens Baths & Design, Inc. <br>Address: 521 W Arrow Hwy, San Dimas, CA, 91773 <br>Phone: 909-497-2456 <br>Website: [a]https%3A%2F%2Fjbkitchensandbaths.com%2F[/a] <br> <br>#External links:- <br> <br>Triberr - [a]https%3A%2F%2Ftriberr.com%2Ftribe%2Fjb-kitchens-baths---design--inc-[/a] <br> <br>The Dots - [a]https%3A%2F%2Fthe-dots.com%2Fpages%2Fjb-kitchens-baths-design-inc-635731[/a] <br> <br>Teamblind - [a]https%3A%2F%2Fwww.teamblind.com%2Fpost%2FJB-Kitchens-Baths-Design-Inc-PznJV7tA[/a] <br> <br>Taplink - [a]https%3A%2F%2Ftaplink.cc%2F[/a] <br> <br>Slides - [a]https%3A%2F%2Fslides.com%2Fjbkitchens%2Fdeck[/a]

Get Paid for Every Phone Call You Make
Are you ready to turn your conversations into cash? For those who would prefer to work from home, phone calls can be a fantastic alternative. Getting paid for phone calls can be an excellent way for every content creator to increase their income. What you love to do can make you money. You can learn how to get paid for phone calls quickly. Start boosting your income today with the power of your voice.

Buy Verified eBay Accounts
Buy Verified eBay Accounts <br>#buy_Verified_eBay_Accounts #usaseoit <br>[a]https%3A%2F%2Fusaseoit.com%2Fproduct%2Fbuy-verified-ebay-accounts%2F[/a] <br>Buy Verified eBay Accounts,Email information,Phone Verified,Sell Internationally,24 hour service access/ Reply/Contact Email: [email protected] WhatsApp:+1 (661) 624-6774 Telegram:

All City Adjusting
AllCity Adjusting is a distinguished firm boasting a collective of highly skilled **licensed insurance adjusters** in the dynamic city of Chicago, IL. Rooted in the heart of the Windy City, we are devoted to advocating for policyholders navigating the complexities of property insurance claims. Our team's mission is to ensure that every client receives fair and just treatment from their insurance companies. We provide personalized, hands-on services tailored to meet the individual needs of our clients throughout Chicago. <br> <br>When disasters hit, be it from fierce storms, fire, or unforeseen incidents that can strike homes or businesses at any time, AllCity Adjusting stands ready as your champion. Our **licensed insurance adjusters** work tirelessly on behalf of Chicagoans to assess damages thoroughly and negotiate assertively with insurers. By meticulously evaluating every aspect of your property insurance claim, we strive to optimize recovery funds to which you're entitled under your policy. <br> <br>Our specialists commit to transparency and communication throughout the adjustment process, ensuring that our clients are informed at every step. With a deep understanding of both local and state insurance laws—and armed with an arsenal of negotiating tactics—our team works diligently to level the playing field against powerful insurers. <br> <br>At AllCity Adjusting, we are acutely aware that confronting a property loss can be an overwhelming experience fraught with uncertainty. It's precisely during these challenging times that having a steadfast ally by your side becomes invaluable. We offer peace of mind by taking over the burden of managing complex property insurance claims and safeguarding our clients’ interests above all else. <br> <br>For residents within Chicago looking for committed expertise in navigating their property insurance claim journey, AllCity Adjusting provides not only unmatched advocacy but also unwavering support—because when it comes down to protecting what’s yours, you deserve nothing less than excellence from your **licensed insurance adjuster** partner. <br> <br>Contact Us :- <br> <br>AllCity Adjusting <br>Address: 111 W Jackson Blvd Suite 1700, Chicago, IL, 60604, USA <br>Phone: 844-692-3587 <br>Email: [email protected] <br>Website: [a]https%3A%2F%2Fwww.allcityadjusting.com%2F[/a] <br> <br>External Link:- <br> <br>Triberr - [a]https%3A%2F%2Ftriberr.com%2Ftribe%2Fallcity-adjusting[/a] <br> <br>The Dots - [a]https%3A%2F%2Fthe-dots.com%2Fusers%2Fallcity-adjusting-1565553[/a] <br> <br>Speaker Deck - [a]https%3A%2F%2Fspeakerdeck.com%2Fallcityadjusting1[/a]

Brother printer setup
The setup procedure for a Brother printer is simplified for the convenience of the user. Make sure all the parts are assembled and unpacked before starting to assemble the printer. Using the included cables or wireless setup options, connect the printer to a power supply and your computer or network. Download and install the required software and drivers from the Brother website to allow your device and printer to work together seamlessly. To ensure your Brother printer performs at its best, follow the step-by-step steps in the setup guide to customize options like paper settings and print quality. <a href=”[a]https%3A%2F%2Fwww.printerfixes.com%2Fbrother-printer-setup-in-6-easy-steps%2F%E2%80%9D%26gt%3BBrother[/a] printer setup <br></a>

Office Desks Los Angeles
While working, you spend a lot of time working on the desk every day. Even features as minute as the position of the monitor and the height of the chair can have a great effect on your productivity and your health. We provide our customers with Office desks Los Angeles that have top-class ergonomics and increases your productivity in your workplace.

Comprehensive Device Solutions at Repair My Phone Today in Oxford
Visit: [a]www.repairmyphone.today[/a] <br>Ph: 01865655261, 01869226455 <br>Email: [email protected] <br>Add 1: 207 Banbury Rd Summertown, Oxford OX2 7HQ, UK <br>Add 2: 25 Market Square Bicester, Oxford OX26 6AD, Uk <br>Add 3: 99 St Aldates, Oxford OX11BT, UK <br>Add 4: 7 New Inn Hall St, Oxford, OX1 2DH, UK <br>Timings: Mon-Sat 9:00 AM - 5:30 PM Sunday 9:00 AM - 5:00 PM

Guarding Against the Dangers of Online Fake News and Harassment
In today's digitally connected world, the prevalence of online fake news and harassment poses a significant threat to individuals and communities alike. To protect ourselves, we must not only be aware of the potential harm these issues can cause but also understand how existing laws, such as Sections 264 and 264.1 of the Canadian Criminal Code, offer protection. This warning sheds light on the unseen dangers of cyberbullying and harassment, encouraging responsible online behaviour. <br> <br>The Legal Framework: A Shield Against Threats <br> <br>Sections 264 and 264.1 of the Canadian Criminal Code establish critical offenses related to harassment and threats. These laws are designed to safeguard individuals from actions that may cause them to fear for their safety or the safety of their loved ones. The offenses encompass various harmful behaviours, including persistent communication, stalking, and engaging in threatening conduct. <br> <br>Hidden Threats: Cyberbullying and Harassment <br> <br>While not explicitly mentioned in the Criminal Code, cyberbullying and harassment undeniably fall within its purview. These harmful actions manifest in various forms online, including: <br> <br>Sharing Intimate Images without Consent: The non-consensual sharing of private images can inflict severe emotional and psychological harm on victims. <br> <br>Intimidation: Threatening messages or actions intended to intimidate someone are not only harmful but also potentially unlawful. <br> <br>Mischief in Relation to Data: Unauthorized access to or manipulation of personal data can lead to severe consequences for individuals. <br> <br>Unauthorized Use of a Computer: Unauthorized entry into someone's computer or online accounts constitutes a breach of privacy and can result in significant harm. <br> <br>Identity Theft: Online identity theft can wreak havoc on a person's financial and personal life. <br> <br>Extortion: Using threats to coerce someone online into providing something of value is not only unethical but also illegal. <br> <br>False Messages, Indecent, or Harassing Communication: Sending false or harassing messages online can inflict emotional distress and harm. <br> <br>Counselling Suicide: Encouraging self-harm or suicide is a grave offense that can have tragic consequences. <br> <br>Incitement of Hatred: Promoting hatred or violence against specific groups or individuals online can lead to real-world harm. <br> <br>Defamatory Libel: The spread of false information about someone online can damage their reputation and livelihood. <br> <br>Public Incitement of Hatred: Inciting hatred against groups or individuals in the online realm can have real-world implications, including violence. <br> <br>Offense Against the Person and Reputation: Online actions can tarnish a person's reputation and contribute to harm to their physical or mental well-being. <br> <br>A Call for Awareness and Responsibility <br> <br>In this digital age, it is incumbent upon all of us to exercise caution and responsibility when navigating online spaces. False information and online harassment have significant consequences for individuals and society as a whole. While the law can provide protection, it is our collective duty to recognize the dangers and act responsibly when engaging with online content and interactions. <br> <br>Let us take inspiration from community champions who dedicate themselves to building a safer and more compassionate digital world. Remember, our online actions have real-world consequences, and it is within our power to make the internet a better and safer place for everyone.
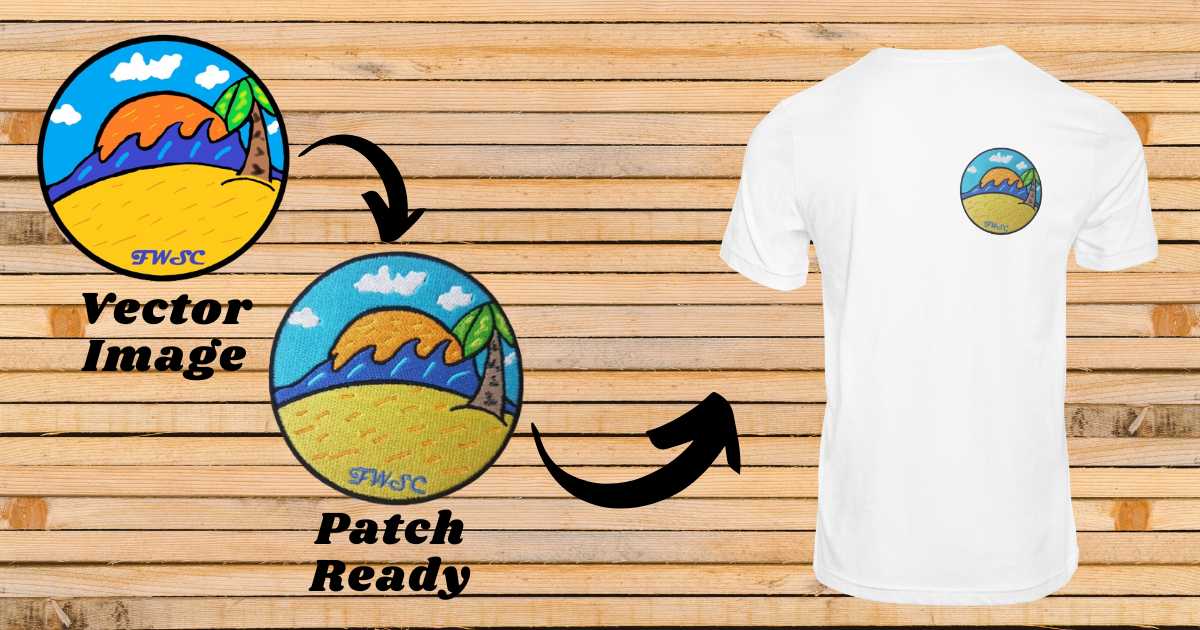
Case Study: Transforming Artwork into Embroidery Masterpieces
Reproducing artwork with needle and thread requires skill, patience, and attention to detail. The embroiderer must carefully analyse the original image, choosing the right fabrics, threads, stitches, and techniques to bring it to life in embroidered form. When done well, the resulting embroidered interpretation honours the original while adding new depth and perspective. Embroidery art is a unique way to transform a painting, drawing, or other visual creation into a textured, dimensional work of embroidered fibber art. <br>Hand embroidery was an established artform, and embroiderers would frequently reference or copy decorative designs, motifs, and images from other artistic works. Today, with the help of computerized embroidery machines and digitizing software, almost any artwork can be translated into stitch, giving embroiderers more creative options to transform meaningful works of art into one-of-a-kind textile masterpieces. Some of the earliest examples of recreating artwork with embroidery date back centuries. <br>Understanding the meticulous efforts that go into each custom embroidered artwork will help us appreciate these fibre masterpieces. This case study will look at the process of recreating existing artwork in embroidery. We'll look at the steps involved, from choosing the right artwork to hooping and stabilizing, choosing fabrics and threads, prepping and digitizing the design, testing sewing, and the embroidering process. Finally, we'll explore finishing techniques and how best to display the completed project. <br>Difficulties in Copying Art in Thread <br>Compared to other embroidery projects, recreating artwork in thread presents a number of distinct challenges. The main ones are attempting to accurately recreate the original artwork's colours, shading, and detail using thread and stitching. <br>The range of colours and shading effects that can be achieved in embroidery, as opposed to painting or drawing, is obviously limited. Since thread comes in a limited palette, it is frequently impossible to match the colours exactly, and the digitizer must make decisions about which hues can be closely approximated and which will require more drastic alterations. <br>In embroidery, shading is achieved through stitches of different lengths and densities, as opposed to smooth colour gradients; translating a painting's or photograph's shading into stitch effects that convey a similar impression requires a great deal of skill; the likeness can be greatly enhanced or diminished by varying the density of stitches in important areas. <br>The smallest error in digitizing can cause important details to disappear or become unrecognizable; the digitizer must err on the side of simplicity when it comes to small details and omission of important details when it comes to intricate textures, fine lines, and small features that are easy to capture on canvas or paper. <br>Although translating visual art into stitched thread is a laborious process that takes experience, patience, trial and error, and a keen eye, artwork can be transformed into remarkable renditions of fibre art that are full of personality, depth, and visual interest when stitched by skilled artists. <br>Digitally Creating the Art <br>Digitizing the original artwork entails scanning the piece and making necessary adjustments to the scanned image in order to prepare it for embroidery, and it is one of the most crucial steps in recreating artwork with embroidery. <br>First, a high-resolution scan of the original artwork is made in order to preserve the integrity of the piece's colours and lines. It's important to use a professional photo scanner for this rather than a cheap flatbed scanner. <br>The image is cleaned up in embroidery digitizing software after it has been scanned. The background is eliminated, the lines are optimized for stitching, and the colours are changed to correspond with the thread palette. <br>Along with sectioning the design, adding underlay and overlap stitches, allocating different types of stitches to different areas, and adjusting the stitch density, the digitizer also prepares the file for the embroidery machine and contributes to the style recreation of the original artwork. <br>It takes an experienced digitizer to navigate the challenges of converting art to stitches. Digitizing is a complex process that combines technical skill and artistic vision. The digitizer's expertise brings the original artwork to life in thread, preserving the artist's distinctive flair while transforming the piece into an embroidered wonder. <br>Selecting Appropriate Fabrics <br>The success of the project depends on choosing the right fabric when converting artwork into embroidered pieces. Since the fabric serves as the canvas for the thread artwork, its qualities have a significant impact on the final product. There are three primary aspects to take into account when choosing fabric for embroidery: <br>Type of Fabric <br>The sort of fabric used for embroidery determines how the threads lay on the surface and how well the stitches hold. Cotton is a popular choice because it is durable and has a small tooth that grabs the threads; linen is strong and textural for showcasing stitchwork; polyester is colourfast and retains its shape well under stitching tension; rayon adds a lovely drape and sheen; blends such as poly-cotton combine the best qualities of both fibres; the fabric type should be appropriate for the specific artwork being translated. <br>Thickness of Fabric <br>Heavy poplin or twill cottons provide an ideal stable base for embroidery; lightweight fabrics can be used but may require additional backing or interfacing. Denser, thicker, high count fabrics are generally better for embroidery than lightweight ones. The density helps prevent distortion or looseness of the stitches. <br>Stability of Fabric <br>Stretchy knits are difficult to embroider because the stitches pull and deform the fabric; backing, topstitching, or hooping can help stabilize problematic fabrics; selecting the most stable fabric for the design style is crucial. Fabric stability is the degree to which the material stretches, distorts, or frays during the rigors of the embroidery process. Tightly woven fabrics, like canvas, hold the stitches best with minimal distortion. <br>The foundation of the embroidered artwork is the fabric; choosing the right textile canvas to translate artwork into exquisite needlework requires careful consideration of factors like fiber content, weight, weave, and stretch properties. <br>Choosing the Colours of the Thread <br>The goal is to match the colours used in the original artwork as closely as possible when recreating artwork in embroidery, but there are a few challenges to consider when choosing the appropriate thread colours: <br>The artwork may contain colours that are challenging to match precisely in embroidery thread; for example, a pure red or bright yellow may need to be replaced with a slightly duller version that is available in embroidery thread colours. <br>- The embroiderer must choose the closest solid color from the available thread options because artwork frequently incorporates gradients or color blending that is difficult to duplicate in thread <br>- Photography artwork adds another level of complexity, as certain colors are only possible with certain lighting and shadow combinations that aren't possible with thread. <br>- The embroiderer must closely examine the artwork in order to discern subtle color variations, such as light blue from medium blue, in thread. <br>- The appearance of the same white thread color varies when it is paired with light or dark fabrics. <br>It takes experience to know which thread colors will or won't work well; the finished product should evoke the artwork with excellent use of color even if an exact match isn't possible. The embroiderer must have a keen eye to study the artwork, identify all the subtle color variations, and select the closest matching shades from available thread colors. <br>Hooping and Leveling Off <br>To achieve a clean, crisp design with minimal fabric distortion and neat edges, proper stabilizing and hooping are essential. Select a hoop that offers taut support throughout the design. Tight fabric facilitates accurate stitch placement and keeps the material from moving while being sewn. <br>A backing gives the embroidery a base by keeping the fabric's threads from moving too much. Common backing options include cut-away, tear-away, and wash-away stabilizers; cut-away stabilizers leave a permanent backing that will stay after the stitching is finished, tear-away stabilizers can be torn off after the embroidery is finished, and wash-away stabilizers dissolve completely when agitated in water. <br>Additional stabilization can be obtained by placing topping stabilizer on the fabric's surface. There are three types of topping stabilizers: water-soluble, heat-away, and self-adhesive. Water-soluble toppings dissolve after stitching, heat-away options can be removed by lightly pressing with an iron, and self-adhesive topping sticks to the fabric's surface to keep stitches from sinking into it. Almost any fabric can be beautifully embroidered with proper hooping and strategic placement of backing and topping. <br>Test Results <br>It is crucial to do some test sew outs before beginning work on the entire artwork piece. To do this, take a small portion of the digitized design, hoop up a scrap piece of fabric with stabilizer, and run it through the embroidery machine. The test sew out accomplishes two things: <br>Checking settings: You want to make sure that the design is sewing out correctly with the stitch speed, tension, and other settings that you have selected for your machine. Adjusting the settings as needed now will help prevent problems when sewing the finished piece. <br>Assessing the quality of the stitching: Examine the stitch formation carefully, looking for any skipped stitches, thread breaks, puckering, etc. Test sew outs offer an opportunity to make any necessary design adjustments before moving forward with the full embroidery. <br>Verifying the size: Measure the test stitch to make sure the scale matches what was anticipated during the digitizing process. <br>Evaluating color registration: A test run will reveal any issues with precise color alignment, which is necessary for designs that have multiple color changes. <br>- Experimenting with fabrics and stabilizers: Before utilizing a particular fabric or stabilizer on the entire piece, try it out on a smaller portion of the design. <br>A beautifully sewn final embroidery project is the result of taking the extra time to perform test sew outs, which help identify and address any areas of concern with the digitized design, machine settings, or materials. <br>The Method of Embroidery <br>When the embroidery machine is configured with the design, you can begin to see the digital artwork come to life in the thread. <br>As the machine sews out the design, the artist must closely monitor each stitch form, making sure the stabilizer is holding, the fabric is feeding smoothly, and the thread tension is correct. This close supervision is necessary to ensure that there are no thread breaks or other problems during the embroidery process. <br>It's fascinating to watch as the layers of thread build up to become the final image. Tiny adjustments may be necessary, such as adjusting thread tension, changing the needle if it becomes dull, or modifying the hooping if the fabric moves. The artist also trims jump stitches between color changes and keeps an eye out for any loops or gaps in the stitching. <br>A large or intricate design may require many hours or even days of stitching; the artist must be patient and diligent to see the design through to completion, but it is always a thrill to take the finished embroidery out of the hoop and trim off the stabilizer to reveal the stitched work of art. <br>Last Minute Details <br>The last step in the embroidery process is to carefully remove the stabilizer backing and trim any extra threads. This finishing touch brings the finished textile artwork to life, completing the transition from digital design. <br>Removing the excess stabilizer reveals the finished embroidery design on the front of the fabric. First, the stabilizer is gently peeled away from the back of the fabric. Tear-away stabilizers can simply be torn off, while cut-away stabilizers need to be trimmed closely to the stitching. <br>Next, any loose or disheveled threads need to be clipped and trimmed; extra tails, leftovers from color changes, and travel stitches can appear on both the top and back bobbin threads; these threads need to be neatly trimmed to avoid taking away from the finished piece's polished appearance; trimming is done carefully so as not to cut any design threads by accident. <br>Finishing touches ensure a clean, professional look that appropriately highlights the transition from digitized design to handcrafted textile art. Meticulous attention to detail transforms a machine-made product into an heirloom-quality creation. Once trimmed, the embroidered artwork is ready for framing, displaying, or incorporating into a larger project. <br>Presenting the Complete Piece <br>Following all of the labour-intensive steps involved in creating the artwork again in embroidery, you should properly display the completed piece to protect and showcase it. The following are some guidelines for doing just that: <br>Screening <br>- To avoid damage over time, select a high-quality frame and mounting materials; acid-free mat board is recommended. <br>- Be mindful of the distance between the glass and the embroidery; you do not want the stitches to rub against the glass. <br>- Verify that the frame is deep enough to hold the hooped or mounted embroidery's thickness. <br>- Place the frame behind glass to avoid dust accumulation and fading from exposure to light. <br>Dangling <br>- Because embroidery hoops can be surprisingly heavy, use special picture hanging hardware made for heavy items when hanging them on a wall. <br>- Verify that the hanging wire or string is sturdy enough to support the weight without breaking. <br>- Provide enough airflow between the embroidery and the wall to manage moisture and stave off mildew. <br> <br>Conservation <br>- To avoid fading, keep embroidery out of direct sunlight. <br>Limit your exposure to humidity and stay away from standing water to prevent the growth of mold. <br>- To stop acid damage over time, use backing made of acid-free tissue or cloth. <br>- Regularly inspect for evidence of wear, fraying, or damage to the stitches; fix them as necessary. <br>If a piece isn't being actively displayed, think about archival storage boxes or protective bags. <br>The final piece can be displayed thoughtfully so that you can enjoy it to the fullest. Proper framing, hanging, and ongoing preservation care will help ensure your labour of love embroidery art retains its vibrancy and lasts for years to come.
The Evolution Of Embroidery Machines: Past, Present, And Future
Embroidery is an ancient art form that has been used to decorate fabrics and garments for thousands of years across many cultures. From colorful peasant blouses to royal gowns studded with jewels, embroidery adds beauty, meaning, and value to clothing. <br> <br>While embroidery was originally done completely by hand using simple tools like needles and thread, the invention of sewing machines in the 1800s paved the way for embroidery to become automated. The first embroidery machines enabled more intricate designs to be sewn faster and with greater consistency than human hands alone could accomplish. <br> <br>Today, computerized embroidery machines are sophisticated tools that can produce complex designs with multiple colors and stitch techniques. The evolution of embroidery equipment has allowed home sewists, crafters, and businesses to create embellished masterpieces that would have been difficult or impossible just a century ago. <br> <br>Early History <br> <br>Hand embroidery dates back thousands of years, with some of the earliest examples found in China, India, ancient Egypt, and medieval Europe. Embroidery was an important part of many ancient cultures, used to decorate clothing, home furnishings, and religious artifacts. <br> <br>In China, silk embroidery was practiced as early as the Shang Dynasty in the 14th century BC. Some of the earliest Chinese embroidery focused on cosmic themes, mythical creatures, and symbolic imagery. By the Han Dynasty (206 BC to 220 AD), embroidery had become extremely sophisticated and prized as an art. The development of silk helped Chinese artisans create delicate and detailed embroidery work. <br> <br>Ancient Egyptian embroidery dates back to around 2400 BC. Extant examples showcase complex pictorial scenes rather than purely decorative motifs. Embroidery was used to decorate the clothing of royals and elites. It signified social status, with finer stitches being associated with higher rank. Egyptian embroiderers used linen threads in bright colors like red, blue, and yellow. <br> <br>Hand embroidery was also prevalent in ancient India. Some of the earliest examples come from the Indus River Valley civilization around 2500 BC. Embroidered shawls found in Mohenjo-daro feature delicate needlework and demonstrate a high level of technical skill. Traditional Indian embroidery draws from a rich iconography of flowers, animals, and geometric patterns. Distinct regional embroidery styles emerged across the subcontinent. <br> <br>In medieval Europe, hand embroidery flourished as an important decorative art. It adorned ecclesiastical vestments, altar cloths, furnishings, and the clothing of nobility. Fine embroidery signaled prestige, wealth, and status. Opus Anglicanum or “English work” was famous for its exquisite embroidery in silk and metal threads. <br> <br>First Sewing Machines <br> <br>The first sewing machines were invented in the early 1800s and paved the way for the development of embroidery machines. In 1790, the English inventor Thomas Saint created one of the first sewing machine designs, though it was never actually constructed. <br> <br>In 1830, French tailor Barthélemy Thimonnier patented the first practical sewing machine to use a chain stitch. Thimonnier’s machine sewed straight seams for clothing and revolutionized garment production. However, riots from French tailors who feared unemployment from the machines led to the destruction of his factory. <br> <br>The first lockstitch sewing machine was invented by American Walter Hunt in 1832-1834. Hunt’s machine used an eye-pointed needle and a second thread to create the lockstitch, but he neglected to patent it at the time. <br> <br>In 1845, American Elias Howe patented the first high-functioning lockstitch sewing machine that was constructed and used commercially. Howe’s machine used two separate threads, a curved needle with an eye at the point, and a shuttle to pass the thread through the cloth. His key innovation was the needle’s eye at the point rather than the middle. <br> <br>The sewing machine was further improved by American inventor Isaac Singer in 1851, who added ball bearings and improved the mechanism. Singer’s machine became immensely popular and was the first practical heavy-duty machine meant for major manufacturing rather than simply individuals. <br> <br>Early Embroidery Machines <br> <br>The first patented embroidery machine was invented in France by Josue Heilmann in 1828. Heilmann was inspired by the Jacquard loom and its ability to weave complex textile patterns automatically. His embroidery machine used punched cards like the ones used in Jacquard looms to guide the needle and create embroidery designs. <br> <br>In the 1860s, William Newton Wilson of London patented the first machine that could stitch cursive monograms and names. This technology was further advanced in the 1870s by brothers Lyman and Cornelius Knapp, who patented new mechanisms on their embroidery machine that allowed for embroidering any shape or outline. Their machine came with punch cards with pre-made designs. By using different cards, various patterns could be embroidered without re-programming the machine. <br> <br>The real breakthrough came in 1872 when Isaac Groebli of Switzerland patented a new kind of shuttle hook for embroidery machines. This provided the framework for commercial embroidery on a much wider scale, as multiple needles could operate on large machines simultaneously to mass-produce embroidery. <br> <br>In the late 1800s, commercial embroidery took off, with large factories of embroidery machines running in Europe and the United States. What started off as just a way to mimic hand embroidery had evolved into a completely mechanized process that opened up embroidery to the public on a huge scale. <br> <br>Computerized Embroidery <br> <br>The embroidery machine industry took a major leap forward in the 1980s with the introduction of computerized embroidery machines. These machines used punch cards or floppy disks to digitally store embroidery designs that could then be stitched out automatically. This opened up an exciting world of possibilities, allowing for more precision, consistency, and complexity in embroidery. <br> <br>Whereas earlier mechanical embroidery machines relied on Cam mechanisms to move the hoop, computerized machines used stepper motors for precise positioning. This enabled them to follow digitized design files and accurately reproduce embroidery motifs. The punch card or floppy disk contained the stitch positioning data, which acted as instructions for the stepper motors. <br> <br>Modern Home Machines <br> <br>The popularity of home embroidery machines has exploded in recent years. Advances in technology have made these machines affordable, user-friendly, and capable of professional quality embroidery right in your own home. <br> <br>Whereas early home embroidery machines were limited to simple designs and poor stitch quality, modern machines can stitch out intricate designs with stunning detail. Built-in computers and LCD touch screens make it easy to edit designs, adjust colors, and get the perfect placement. <br> <br>Features like automatic thread trimmers, multiple hoops and frames, and embroidery editing software are now standard. Wireless connectivity allows you to download designs and update machine software without cables. Automatic thread tension and presser foot pressure take the guesswork out of setup. <br> <br>Modern embroidery machines range from inexpensive starter models under $500 to advanced multi-need professional machines costing several thousand dollars. Most hobbyists opt for a mid-range model in the $800 to $1500 range which offers versatility for both embroidery and regular sewing. <br> <br>With a home embroidery machine, crafters and home decorating enthusiasts can add a personal touch to clothing, hats, towels, bags, quilts, and more. It’s an accessible craft that allows you to embellish your projects with custom monograms, names, motifs, and unique designs. The embroidery possibilities are endless. <br> <br>Industrial Machines <br> <br>Industrial embroidery machines are designed for large-scale commercial production and maximum efficiency. Unlike home embroidery machines, industrial machines are faster, more durable, and capable of embroidering much larger areas. <br> <br>The biggest difference between industrial and home embroidery machines is speed. Industrial machines can stitch at speeds from 700 to 1500 stitches per minute. This allows companies to produce embroidered items much faster. Some industrial machines have multiple heads, allowing them to work on multiple products at once. For example, a 15-head embroidery machine can embroider 15 shirts simultaneously. <br> <br>Industrial embroidery machines have much larger embroidery fields than home machines. The embroidery field is the maximum hoop size the machine can accommodate. Home embroidery machine hoops are usually 6×10 inches to 8×12 inches. Industrial machines can embroider fields from 16×20 inches up to 28×40 inches. This expanded area allows them to embroider large designs, jacket backs, sheets, and other oversized items impossible on a home machine. <br> <br>These machines are built for durability, capable of running 24/7 in production environments. They use heavy-duty parts including industrial-grade needles, motors, and internal components. Most industrial embroidery machines come with a variety of convenient features for commercial work, like automatic thread trimmers, auto oiling systems, large thread capacities, and enhanced computer connectivity. <br> <br>Advanced capabilities of industrial embroidery machines include specialized techniques like 3D puff embroidery, sequin embroidery, chenille embroidery, applique, and more. The computerized software allows for editing and customization of designs as well as integration with other equipment. Overall, industrial embroidery machines offer power, speed, reliability and versatility for professional embroidery work. <br> <br>Embroidery Machine Software <br> <br>One of the biggest evolutions in embroidery has been in design software. Early embroidery machines only allowed stitching preset designs. To stitch a new design, it had to be digitized on a computer with CAD-like software and transferred to the machine via a memory card or cable. <br> <br>The first home computerized embroidery machines in the late 1980s and early 1990s came with limited built-in design capabilities. Users could edit preset designs and create simple lettering and shapes. <br> <br>In the mid-1990s, more advanced design software emerged for home computers. Programs like Amazing Designs allowed home embroiderers to digitize images into stitches with various tools and effects. <br> <br>Today’s embroidery software provides sophisticated editing tools like stitch splitting, color sorting, stitch angle changes, object transforms and combining designs. Popular programs used with home and industrial machines include Artista, Bernina Embroidery Software, Brother PE-Design, Husqvarna Viking Embroidery Software, Janome DigitizerMB, Pulse Ambassador and more. <br> <br>The Future <br> <br>The future of embroidery machines looks bright as the technology continues to advance rapidly. Here are some predictions for where embroidery technology is heading: <br> <br>– Higher resolution and more detail – Machines will be able to produce embroidery with increasing detail and dimension, mimicking the look of hand embroidery even more closely. <br> <br>– Faster speeds – Industrial machines are already extremely fast, but home models will catch up, allowing embroiderers to complete projects more quickly. <br> <br>– Wider embroidery fields – The size of the embroidery field will expand, allowing for bigger and more complex designs to be stitched out in one hooping. <br> <br>– More connectivity and digitization – Machines will become more connected to external software and the cloud, improving digitizing capabilities directly on the machine. <br> <br>– Increased automation – With improving AI and computer vision, machines may take on more steps of the embroidery process with less human intervention needed. <br> <br>– Specialty techniques – Machines will master specialized techniques like lace making, applique, quilting, and other effects. <br> <br>– Customization – On-demand customization and personalization will be easier than ever. <br> <br>– Lower costs – Improved manufacturing and competition will continue to lower prices and make advanced features more accessible. <br> <br>– User-friendly features – Better display screens, tutorials, troubleshooting and more intuitive controls will allow new users to get up to speed quickly. <br> <br>– More versatile uses – Embroidery will expand beyond just fabric into gifts, paper crafts, home decor, leather, and more. <br> <br>While embroidery started out as an artisan craft, machines have allowed it to become a popular hobby and industry. As technology progresses, embroidery will reach new heights in artistry and application. Both professionals and home embroiderers have an exciting future ahead with more possibilities than ever. <br> <br>Conclusion <br> <br>The history of embroidery machines has been a progression from basic hand-operated tools to computerized industrial machines and everything in between. From the first sewing machines adapted to create simple stitches in the 1800s to the programmable home embroidery machines of today, the capabilities and convenience have vastly improved. <br> <br>The development of computerized embroidery took the craft to a new level, enabling multi-color designs and precision stitching. While industrial machines continue pushing the boundaries of speed and capabilities, home embroidery machines now offer hobbyists and small business owners the chance to embellish garments and crafts with detailed embroidery designs at the touch of a button. <br> <br>[a]https%3A%2F%2Fwww.digitize4life.com[/a]

Advanced Systemcare 17 key
Advanced Systemcare 17 key is a software suite developed by IObit that aims to optimize, clean, and secure your computer. It is designed to improve system performance, fix various issues, and enhance overall system stability. Get Activated Software Free: [a]https%3A%2F%2Fdriver-booster-11-key.com%2Fadvanced-systemcare-17-key%2F[/a]
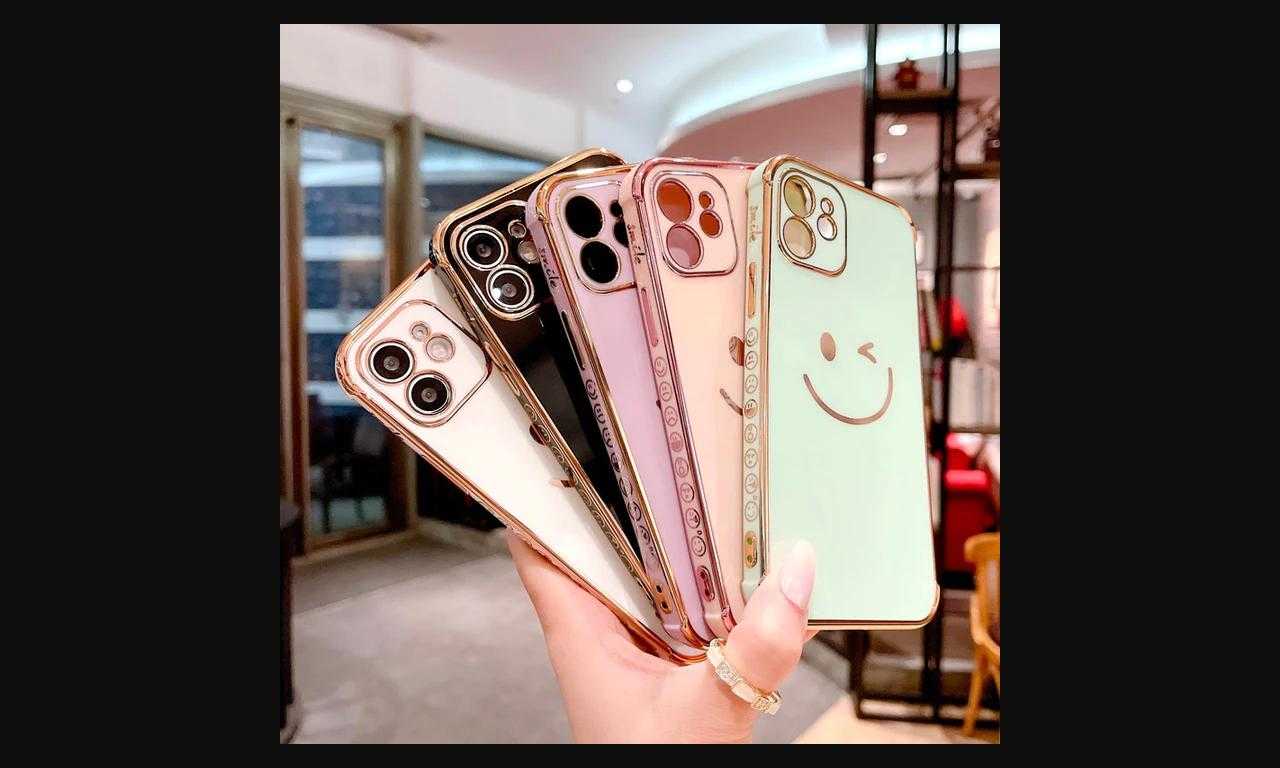
Buy Smile Face Iphone Cases
Various smiley faces grouped in patterns, a single giant happy face design, or variations in facial emotions like winking; laughing, or putting out the tongue may all be seen on Smile Face Iphone Cases. These patterns can provide the iPhone cover with a humorous and enjoyable touch. Users may select a case that best suits their tastes or personal style from a broad selection of color options available for these cases. Yellow is a common hue for smiley face iPhone covers. Vibrant colors are also used to create eye-catching designs.
JB Kitchens Baths & Design, Inc.
Milwaukee Underground Productions - Your Premier Wedding DJ Service for Southeastern Wisconsin! <br> <br>Choose Milwaukee Underground Productions as your premier Wedding DJ Service in Southeastern Wisconsin. Our service area includes Milwaukee, Milwaukee County, Waukesha County, Ozaukee County, Washington County, Racine County, Kenosha County, Walworth County, Jefferson County, and Dodge County. We're conveniently located at 2210 10th Ave Suite 202, South Milwaukee, WI, USA, and we're here to make your wedding unforgettable. <br> <br>Selecting the right DJ is crucial, and we understand the significance of this decision. Our team of experienced and personable DJs is dedicated to providing exceptional customer service. You have the option to meet your DJ before booking to ensure the perfect match for your event. If you're uncertain, our experts can guide you in selecting the ideal DJ based on your preferences. <br> <br>Introducing our NEW Client Portal, designed to simplify and expedite the booking process. With the portal, you can quickly create a custom DJ quote, sign your DJ contract, and submit your music and timeline template—all within minutes. Booking a Wedding DJ with us is swift and efficient, allowing you to focus on other aspects of your wedding planning. Plus, we offer optional enhancements like Photo Booth and Room Lighting to enhance your celebration. <br> <br>Our comprehensive DJ services include custom music curation, song requests, DJ lighting, wireless microphones, MC services, and a state-of-the-art sound system. We take pride in crafting a playlist that will keep your guests dancing and having a fantastic time. <br> <br>Here's a heartfelt testimonial from one of our satisfied clients: <br> <br>Chris at Milwaukee Underground Productions was so wonderful to work with for our wedding! From our very first meeting, we could tell that he was genuine and invested in us, and that caring quality translated throughout the process. Both being music majors, we had pretty specific music requests that he accommodated without hesitation. All our guests raved (and continue to comment on!) our DJ and how much fun the dance was. I would HIGHLY recommend Milwaukee Underground Productions for any event!" - Jennifer G, October 1, 2021, Wedding DJ Service <br>We're excited to discuss your special event and make it truly unforgettable. Contact us today to discover why we're the top choice for Wedding DJ services in Southeastern Wisconsin! <br> <br>#Contact Us:- <br> <br>JB Kitchens Baths & Design, Inc. <br>Address: 521 W Arrow Hwy, San Dimas, CA, 91773 <br>Phone: 909-497-2456 <br>Website: [a]https%3A%2F%2Fjbkitchensandbaths.com%2F[/a] <br> <br>#External links:- <br> <br>Triberr - [a]https%3A%2F%2Ftriberr.com%2Ftribe%2Fjb-kitchens-baths---design--inc-[/a] <br> <br>The Dots - [a]https%3A%2F%2Fthe-dots.com%2Fpages%2Fjb-kitchens-baths-design-inc-635731[/a] <br> <br>Teamblind - [a]https%3A%2F%2Fwww.teamblind.com%2Fpost%2FJB-Kitchens-Baths-Design-Inc-PznJV7tA[/a] <br> <br>Taplink - [a]https%3A%2F%2Ftaplink.cc%2F[/a] <br> <br>Slides - [a]https%3A%2F%2Fslides.com%2Fjbkitchens%2Fdeck[/a]
Get Paid for Every Phone Call You Make
Are you ready to turn your conversations into cash? For those who would prefer to work from home, phone calls can be a fantastic alternative. Getting paid for phone calls can be an excellent way for every content creator to increase their income. What you love to do can make you money. You can learn how to get paid for phone calls quickly. Start boosting your income today with the power of your voice.
Buy Verified eBay Accounts
Buy Verified eBay Accounts <br>#buy_Verified_eBay_Accounts #usaseoit <br>[a]https%3A%2F%2Fusaseoit.com%2Fproduct%2Fbuy-verified-ebay-accounts%2F[/a] <br>Buy Verified eBay Accounts,Email information,Phone Verified,Sell Internationally,24 hour service access/ Reply/Contact Email: [email protected] WhatsApp:+1 (661) 624-6774 Telegram:
All City Adjusting
AllCity Adjusting is a distinguished firm boasting a collective of highly skilled **licensed insurance adjusters** in the dynamic city of Chicago, IL. Rooted in the heart of the Windy City, we are devoted to advocating for policyholders navigating the complexities of property insurance claims. Our team's mission is to ensure that every client receives fair and just treatment from their insurance companies. We provide personalized, hands-on services tailored to meet the individual needs of our clients throughout Chicago. <br> <br>When disasters hit, be it from fierce storms, fire, or unforeseen incidents that can strike homes or businesses at any time, AllCity Adjusting stands ready as your champion. Our **licensed insurance adjusters** work tirelessly on behalf of Chicagoans to assess damages thoroughly and negotiate assertively with insurers. By meticulously evaluating every aspect of your property insurance claim, we strive to optimize recovery funds to which you're entitled under your policy. <br> <br>Our specialists commit to transparency and communication throughout the adjustment process, ensuring that our clients are informed at every step. With a deep understanding of both local and state insurance laws—and armed with an arsenal of negotiating tactics—our team works diligently to level the playing field against powerful insurers. <br> <br>At AllCity Adjusting, we are acutely aware that confronting a property loss can be an overwhelming experience fraught with uncertainty. It's precisely during these challenging times that having a steadfast ally by your side becomes invaluable. We offer peace of mind by taking over the burden of managing complex property insurance claims and safeguarding our clients’ interests above all else. <br> <br>For residents within Chicago looking for committed expertise in navigating their property insurance claim journey, AllCity Adjusting provides not only unmatched advocacy but also unwavering support—because when it comes down to protecting what’s yours, you deserve nothing less than excellence from your **licensed insurance adjuster** partner. <br> <br>Contact Us :- <br> <br>AllCity Adjusting <br>Address: 111 W Jackson Blvd Suite 1700, Chicago, IL, 60604, USA <br>Phone: 844-692-3587 <br>Email: [email protected] <br>Website: [a]https%3A%2F%2Fwww.allcityadjusting.com%2F[/a] <br> <br>External Link:- <br> <br>Triberr - [a]https%3A%2F%2Ftriberr.com%2Ftribe%2Fallcity-adjusting[/a] <br> <br>The Dots - [a]https%3A%2F%2Fthe-dots.com%2Fusers%2Fallcity-adjusting-1565553[/a] <br> <br>Speaker Deck - [a]https%3A%2F%2Fspeakerdeck.com%2Fallcityadjusting1[/a]
Brother printer setup
The setup procedure for a Brother printer is simplified for the convenience of the user. Make sure all the parts are assembled and unpacked before starting to assemble the printer. Using the included cables or wireless setup options, connect the printer to a power supply and your computer or network. Download and install the required software and drivers from the Brother website to allow your device and printer to work together seamlessly. To ensure your Brother printer performs at its best, follow the step-by-step steps in the setup guide to customize options like paper settings and print quality. <a href=”[a]https%3A%2F%2Fwww.printerfixes.com%2Fbrother-printer-setup-in-6-easy-steps%2F%E2%80%9D%26gt%3BBrother[/a] printer setup <br></a>
Office Desks Los Angeles
While working, you spend a lot of time working on the desk every day. Even features as minute as the position of the monitor and the height of the chair can have a great effect on your productivity and your health. We provide our customers with Office desks Los Angeles that have top-class ergonomics and increases your productivity in your workplace.
Comprehensive Device Solutions at Repair My Phone Today in Oxford
Visit: [a]www.repairmyphone.today[/a] <br>Ph: 01865655261, 01869226455 <br>Email: [email protected] <br>Add 1: 207 Banbury Rd Summertown, Oxford OX2 7HQ, UK <br>Add 2: 25 Market Square Bicester, Oxford OX26 6AD, Uk <br>Add 3: 99 St Aldates, Oxford OX11BT, UK <br>Add 4: 7 New Inn Hall St, Oxford, OX1 2DH, UK <br>Timings: Mon-Sat 9:00 AM - 5:30 PM Sunday 9:00 AM - 5:00 PM
Guarding Against the Dangers of Online Fake News and Harassment
In today's digitally connected world, the prevalence of online fake news and harassment poses a significant threat to individuals and communities alike. To protect ourselves, we must not only be aware of the potential harm these issues can cause but also understand how existing laws, such as Sections 264 and 264.1 of the Canadian Criminal Code, offer protection. This warning sheds light on the unseen dangers of cyberbullying and harassment, encouraging responsible online behaviour. <br> <br>The Legal Framework: A Shield Against Threats <br> <br>Sections 264 and 264.1 of the Canadian Criminal Code establish critical offenses related to harassment and threats. These laws are designed to safeguard individuals from actions that may cause them to fear for their safety or the safety of their loved ones. The offenses encompass various harmful behaviours, including persistent communication, stalking, and engaging in threatening conduct. <br> <br>Hidden Threats: Cyberbullying and Harassment <br> <br>While not explicitly mentioned in the Criminal Code, cyberbullying and harassment undeniably fall within its purview. These harmful actions manifest in various forms online, including: <br> <br>Sharing Intimate Images without Consent: The non-consensual sharing of private images can inflict severe emotional and psychological harm on victims. <br> <br>Intimidation: Threatening messages or actions intended to intimidate someone are not only harmful but also potentially unlawful. <br> <br>Mischief in Relation to Data: Unauthorized access to or manipulation of personal data can lead to severe consequences for individuals. <br> <br>Unauthorized Use of a Computer: Unauthorized entry into someone's computer or online accounts constitutes a breach of privacy and can result in significant harm. <br> <br>Identity Theft: Online identity theft can wreak havoc on a person's financial and personal life. <br> <br>Extortion: Using threats to coerce someone online into providing something of value is not only unethical but also illegal. <br> <br>False Messages, Indecent, or Harassing Communication: Sending false or harassing messages online can inflict emotional distress and harm. <br> <br>Counselling Suicide: Encouraging self-harm or suicide is a grave offense that can have tragic consequences. <br> <br>Incitement of Hatred: Promoting hatred or violence against specific groups or individuals online can lead to real-world harm. <br> <br>Defamatory Libel: The spread of false information about someone online can damage their reputation and livelihood. <br> <br>Public Incitement of Hatred: Inciting hatred against groups or individuals in the online realm can have real-world implications, including violence. <br> <br>Offense Against the Person and Reputation: Online actions can tarnish a person's reputation and contribute to harm to their physical or mental well-being. <br> <br>A Call for Awareness and Responsibility <br> <br>In this digital age, it is incumbent upon all of us to exercise caution and responsibility when navigating online spaces. False information and online harassment have significant consequences for individuals and society as a whole. While the law can provide protection, it is our collective duty to recognize the dangers and act responsibly when engaging with online content and interactions. <br> <br>Let us take inspiration from community champions who dedicate themselves to building a safer and more compassionate digital world. Remember, our online actions have real-world consequences, and it is within our power to make the internet a better and safer place for everyone.
Case Study: Transforming Artwork into Embroidery Masterpieces
Reproducing artwork with needle and thread requires skill, patience, and attention to detail. The embroiderer must carefully analyse the original image, choosing the right fabrics, threads, stitches, and techniques to bring it to life in embroidered form. When done well, the resulting embroidered interpretation honours the original while adding new depth and perspective. Embroidery art is a unique way to transform a painting, drawing, or other visual creation into a textured, dimensional work of embroidered fibber art. <br>Hand embroidery was an established artform, and embroiderers would frequently reference or copy decorative designs, motifs, and images from other artistic works. Today, with the help of computerized embroidery machines and digitizing software, almost any artwork can be translated into stitch, giving embroiderers more creative options to transform meaningful works of art into one-of-a-kind textile masterpieces. Some of the earliest examples of recreating artwork with embroidery date back centuries. <br>Understanding the meticulous efforts that go into each custom embroidered artwork will help us appreciate these fibre masterpieces. This case study will look at the process of recreating existing artwork in embroidery. We'll look at the steps involved, from choosing the right artwork to hooping and stabilizing, choosing fabrics and threads, prepping and digitizing the design, testing sewing, and the embroidering process. Finally, we'll explore finishing techniques and how best to display the completed project. <br>Difficulties in Copying Art in Thread <br>Compared to other embroidery projects, recreating artwork in thread presents a number of distinct challenges. The main ones are attempting to accurately recreate the original artwork's colours, shading, and detail using thread and stitching. <br>The range of colours and shading effects that can be achieved in embroidery, as opposed to painting or drawing, is obviously limited. Since thread comes in a limited palette, it is frequently impossible to match the colours exactly, and the digitizer must make decisions about which hues can be closely approximated and which will require more drastic alterations. <br>In embroidery, shading is achieved through stitches of different lengths and densities, as opposed to smooth colour gradients; translating a painting's or photograph's shading into stitch effects that convey a similar impression requires a great deal of skill; the likeness can be greatly enhanced or diminished by varying the density of stitches in important areas. <br>The smallest error in digitizing can cause important details to disappear or become unrecognizable; the digitizer must err on the side of simplicity when it comes to small details and omission of important details when it comes to intricate textures, fine lines, and small features that are easy to capture on canvas or paper. <br>Although translating visual art into stitched thread is a laborious process that takes experience, patience, trial and error, and a keen eye, artwork can be transformed into remarkable renditions of fibre art that are full of personality, depth, and visual interest when stitched by skilled artists. <br>Digitally Creating the Art <br>Digitizing the original artwork entails scanning the piece and making necessary adjustments to the scanned image in order to prepare it for embroidery, and it is one of the most crucial steps in recreating artwork with embroidery. <br>First, a high-resolution scan of the original artwork is made in order to preserve the integrity of the piece's colours and lines. It's important to use a professional photo scanner for this rather than a cheap flatbed scanner. <br>The image is cleaned up in embroidery digitizing software after it has been scanned. The background is eliminated, the lines are optimized for stitching, and the colours are changed to correspond with the thread palette. <br>Along with sectioning the design, adding underlay and overlap stitches, allocating different types of stitches to different areas, and adjusting the stitch density, the digitizer also prepares the file for the embroidery machine and contributes to the style recreation of the original artwork. <br>It takes an experienced digitizer to navigate the challenges of converting art to stitches. Digitizing is a complex process that combines technical skill and artistic vision. The digitizer's expertise brings the original artwork to life in thread, preserving the artist's distinctive flair while transforming the piece into an embroidered wonder. <br>Selecting Appropriate Fabrics <br>The success of the project depends on choosing the right fabric when converting artwork into embroidered pieces. Since the fabric serves as the canvas for the thread artwork, its qualities have a significant impact on the final product. There are three primary aspects to take into account when choosing fabric for embroidery: <br>Type of Fabric <br>The sort of fabric used for embroidery determines how the threads lay on the surface and how well the stitches hold. Cotton is a popular choice because it is durable and has a small tooth that grabs the threads; linen is strong and textural for showcasing stitchwork; polyester is colourfast and retains its shape well under stitching tension; rayon adds a lovely drape and sheen; blends such as poly-cotton combine the best qualities of both fibres; the fabric type should be appropriate for the specific artwork being translated. <br>Thickness of Fabric <br>Heavy poplin or twill cottons provide an ideal stable base for embroidery; lightweight fabrics can be used but may require additional backing or interfacing. Denser, thicker, high count fabrics are generally better for embroidery than lightweight ones. The density helps prevent distortion or looseness of the stitches. <br>Stability of Fabric <br>Stretchy knits are difficult to embroider because the stitches pull and deform the fabric; backing, topstitching, or hooping can help stabilize problematic fabrics; selecting the most stable fabric for the design style is crucial. Fabric stability is the degree to which the material stretches, distorts, or frays during the rigors of the embroidery process. Tightly woven fabrics, like canvas, hold the stitches best with minimal distortion. <br>The foundation of the embroidered artwork is the fabric; choosing the right textile canvas to translate artwork into exquisite needlework requires careful consideration of factors like fiber content, weight, weave, and stretch properties. <br>Choosing the Colours of the Thread <br>The goal is to match the colours used in the original artwork as closely as possible when recreating artwork in embroidery, but there are a few challenges to consider when choosing the appropriate thread colours: <br>The artwork may contain colours that are challenging to match precisely in embroidery thread; for example, a pure red or bright yellow may need to be replaced with a slightly duller version that is available in embroidery thread colours. <br>- The embroiderer must choose the closest solid color from the available thread options because artwork frequently incorporates gradients or color blending that is difficult to duplicate in thread <br>- Photography artwork adds another level of complexity, as certain colors are only possible with certain lighting and shadow combinations that aren't possible with thread. <br>- The embroiderer must closely examine the artwork in order to discern subtle color variations, such as light blue from medium blue, in thread. <br>- The appearance of the same white thread color varies when it is paired with light or dark fabrics. <br>It takes experience to know which thread colors will or won't work well; the finished product should evoke the artwork with excellent use of color even if an exact match isn't possible. The embroiderer must have a keen eye to study the artwork, identify all the subtle color variations, and select the closest matching shades from available thread colors. <br>Hooping and Leveling Off <br>To achieve a clean, crisp design with minimal fabric distortion and neat edges, proper stabilizing and hooping are essential. Select a hoop that offers taut support throughout the design. Tight fabric facilitates accurate stitch placement and keeps the material from moving while being sewn. <br>A backing gives the embroidery a base by keeping the fabric's threads from moving too much. Common backing options include cut-away, tear-away, and wash-away stabilizers; cut-away stabilizers leave a permanent backing that will stay after the stitching is finished, tear-away stabilizers can be torn off after the embroidery is finished, and wash-away stabilizers dissolve completely when agitated in water. <br>Additional stabilization can be obtained by placing topping stabilizer on the fabric's surface. There are three types of topping stabilizers: water-soluble, heat-away, and self-adhesive. Water-soluble toppings dissolve after stitching, heat-away options can be removed by lightly pressing with an iron, and self-adhesive topping sticks to the fabric's surface to keep stitches from sinking into it. Almost any fabric can be beautifully embroidered with proper hooping and strategic placement of backing and topping. <br>Test Results <br>It is crucial to do some test sew outs before beginning work on the entire artwork piece. To do this, take a small portion of the digitized design, hoop up a scrap piece of fabric with stabilizer, and run it through the embroidery machine. The test sew out accomplishes two things: <br>Checking settings: You want to make sure that the design is sewing out correctly with the stitch speed, tension, and other settings that you have selected for your machine. Adjusting the settings as needed now will help prevent problems when sewing the finished piece. <br>Assessing the quality of the stitching: Examine the stitch formation carefully, looking for any skipped stitches, thread breaks, puckering, etc. Test sew outs offer an opportunity to make any necessary design adjustments before moving forward with the full embroidery. <br>Verifying the size: Measure the test stitch to make sure the scale matches what was anticipated during the digitizing process. <br>Evaluating color registration: A test run will reveal any issues with precise color alignment, which is necessary for designs that have multiple color changes. <br>- Experimenting with fabrics and stabilizers: Before utilizing a particular fabric or stabilizer on the entire piece, try it out on a smaller portion of the design. <br>A beautifully sewn final embroidery project is the result of taking the extra time to perform test sew outs, which help identify and address any areas of concern with the digitized design, machine settings, or materials. <br>The Method of Embroidery <br>When the embroidery machine is configured with the design, you can begin to see the digital artwork come to life in the thread. <br>As the machine sews out the design, the artist must closely monitor each stitch form, making sure the stabilizer is holding, the fabric is feeding smoothly, and the thread tension is correct. This close supervision is necessary to ensure that there are no thread breaks or other problems during the embroidery process. <br>It's fascinating to watch as the layers of thread build up to become the final image. Tiny adjustments may be necessary, such as adjusting thread tension, changing the needle if it becomes dull, or modifying the hooping if the fabric moves. The artist also trims jump stitches between color changes and keeps an eye out for any loops or gaps in the stitching. <br>A large or intricate design may require many hours or even days of stitching; the artist must be patient and diligent to see the design through to completion, but it is always a thrill to take the finished embroidery out of the hoop and trim off the stabilizer to reveal the stitched work of art. <br>Last Minute Details <br>The last step in the embroidery process is to carefully remove the stabilizer backing and trim any extra threads. This finishing touch brings the finished textile artwork to life, completing the transition from digital design. <br>Removing the excess stabilizer reveals the finished embroidery design on the front of the fabric. First, the stabilizer is gently peeled away from the back of the fabric. Tear-away stabilizers can simply be torn off, while cut-away stabilizers need to be trimmed closely to the stitching. <br>Next, any loose or disheveled threads need to be clipped and trimmed; extra tails, leftovers from color changes, and travel stitches can appear on both the top and back bobbin threads; these threads need to be neatly trimmed to avoid taking away from the finished piece's polished appearance; trimming is done carefully so as not to cut any design threads by accident. <br>Finishing touches ensure a clean, professional look that appropriately highlights the transition from digitized design to handcrafted textile art. Meticulous attention to detail transforms a machine-made product into an heirloom-quality creation. Once trimmed, the embroidered artwork is ready for framing, displaying, or incorporating into a larger project. <br>Presenting the Complete Piece <br>Following all of the labour-intensive steps involved in creating the artwork again in embroidery, you should properly display the completed piece to protect and showcase it. The following are some guidelines for doing just that: <br>Screening <br>- To avoid damage over time, select a high-quality frame and mounting materials; acid-free mat board is recommended. <br>- Be mindful of the distance between the glass and the embroidery; you do not want the stitches to rub against the glass. <br>- Verify that the frame is deep enough to hold the hooped or mounted embroidery's thickness. <br>- Place the frame behind glass to avoid dust accumulation and fading from exposure to light. <br>Dangling <br>- Because embroidery hoops can be surprisingly heavy, use special picture hanging hardware made for heavy items when hanging them on a wall. <br>- Verify that the hanging wire or string is sturdy enough to support the weight without breaking. <br>- Provide enough airflow between the embroidery and the wall to manage moisture and stave off mildew. <br> <br>Conservation <br>- To avoid fading, keep embroidery out of direct sunlight. <br>Limit your exposure to humidity and stay away from standing water to prevent the growth of mold. <br>- To stop acid damage over time, use backing made of acid-free tissue or cloth. <br>- Regularly inspect for evidence of wear, fraying, or damage to the stitches; fix them as necessary. <br>If a piece isn't being actively displayed, think about archival storage boxes or protective bags. <br>The final piece can be displayed thoughtfully so that you can enjoy it to the fullest. Proper framing, hanging, and ongoing preservation care will help ensure your labour of love embroidery art retains its vibrancy and lasts for years to come.
The Evolution Of Embroidery Machines: Past, Present, And Future
Embroidery is an ancient art form that has been used to decorate fabrics and garments for thousands of years across many cultures. From colorful peasant blouses to royal gowns studded with jewels, embroidery adds beauty, meaning, and value to clothing. <br> <br>While embroidery was originally done completely by hand using simple tools like needles and thread, the invention of sewing machines in the 1800s paved the way for embroidery to become automated. The first embroidery machines enabled more intricate designs to be sewn faster and with greater consistency than human hands alone could accomplish. <br> <br>Today, computerized embroidery machines are sophisticated tools that can produce complex designs with multiple colors and stitch techniques. The evolution of embroidery equipment has allowed home sewists, crafters, and businesses to create embellished masterpieces that would have been difficult or impossible just a century ago. <br> <br>Early History <br> <br>Hand embroidery dates back thousands of years, with some of the earliest examples found in China, India, ancient Egypt, and medieval Europe. Embroidery was an important part of many ancient cultures, used to decorate clothing, home furnishings, and religious artifacts. <br> <br>In China, silk embroidery was practiced as early as the Shang Dynasty in the 14th century BC. Some of the earliest Chinese embroidery focused on cosmic themes, mythical creatures, and symbolic imagery. By the Han Dynasty (206 BC to 220 AD), embroidery had become extremely sophisticated and prized as an art. The development of silk helped Chinese artisans create delicate and detailed embroidery work. <br> <br>Ancient Egyptian embroidery dates back to around 2400 BC. Extant examples showcase complex pictorial scenes rather than purely decorative motifs. Embroidery was used to decorate the clothing of royals and elites. It signified social status, with finer stitches being associated with higher rank. Egyptian embroiderers used linen threads in bright colors like red, blue, and yellow. <br> <br>Hand embroidery was also prevalent in ancient India. Some of the earliest examples come from the Indus River Valley civilization around 2500 BC. Embroidered shawls found in Mohenjo-daro feature delicate needlework and demonstrate a high level of technical skill. Traditional Indian embroidery draws from a rich iconography of flowers, animals, and geometric patterns. Distinct regional embroidery styles emerged across the subcontinent. <br> <br>In medieval Europe, hand embroidery flourished as an important decorative art. It adorned ecclesiastical vestments, altar cloths, furnishings, and the clothing of nobility. Fine embroidery signaled prestige, wealth, and status. Opus Anglicanum or “English work” was famous for its exquisite embroidery in silk and metal threads. <br> <br>First Sewing Machines <br> <br>The first sewing machines were invented in the early 1800s and paved the way for the development of embroidery machines. In 1790, the English inventor Thomas Saint created one of the first sewing machine designs, though it was never actually constructed. <br> <br>In 1830, French tailor Barthélemy Thimonnier patented the first practical sewing machine to use a chain stitch. Thimonnier’s machine sewed straight seams for clothing and revolutionized garment production. However, riots from French tailors who feared unemployment from the machines led to the destruction of his factory. <br> <br>The first lockstitch sewing machine was invented by American Walter Hunt in 1832-1834. Hunt’s machine used an eye-pointed needle and a second thread to create the lockstitch, but he neglected to patent it at the time. <br> <br>In 1845, American Elias Howe patented the first high-functioning lockstitch sewing machine that was constructed and used commercially. Howe’s machine used two separate threads, a curved needle with an eye at the point, and a shuttle to pass the thread through the cloth. His key innovation was the needle’s eye at the point rather than the middle. <br> <br>The sewing machine was further improved by American inventor Isaac Singer in 1851, who added ball bearings and improved the mechanism. Singer’s machine became immensely popular and was the first practical heavy-duty machine meant for major manufacturing rather than simply individuals. <br> <br>Early Embroidery Machines <br> <br>The first patented embroidery machine was invented in France by Josue Heilmann in 1828. Heilmann was inspired by the Jacquard loom and its ability to weave complex textile patterns automatically. His embroidery machine used punched cards like the ones used in Jacquard looms to guide the needle and create embroidery designs. <br> <br>In the 1860s, William Newton Wilson of London patented the first machine that could stitch cursive monograms and names. This technology was further advanced in the 1870s by brothers Lyman and Cornelius Knapp, who patented new mechanisms on their embroidery machine that allowed for embroidering any shape or outline. Their machine came with punch cards with pre-made designs. By using different cards, various patterns could be embroidered without re-programming the machine. <br> <br>The real breakthrough came in 1872 when Isaac Groebli of Switzerland patented a new kind of shuttle hook for embroidery machines. This provided the framework for commercial embroidery on a much wider scale, as multiple needles could operate on large machines simultaneously to mass-produce embroidery. <br> <br>In the late 1800s, commercial embroidery took off, with large factories of embroidery machines running in Europe and the United States. What started off as just a way to mimic hand embroidery had evolved into a completely mechanized process that opened up embroidery to the public on a huge scale. <br> <br>Computerized Embroidery <br> <br>The embroidery machine industry took a major leap forward in the 1980s with the introduction of computerized embroidery machines. These machines used punch cards or floppy disks to digitally store embroidery designs that could then be stitched out automatically. This opened up an exciting world of possibilities, allowing for more precision, consistency, and complexity in embroidery. <br> <br>Whereas earlier mechanical embroidery machines relied on Cam mechanisms to move the hoop, computerized machines used stepper motors for precise positioning. This enabled them to follow digitized design files and accurately reproduce embroidery motifs. The punch card or floppy disk contained the stitch positioning data, which acted as instructions for the stepper motors. <br> <br>Modern Home Machines <br> <br>The popularity of home embroidery machines has exploded in recent years. Advances in technology have made these machines affordable, user-friendly, and capable of professional quality embroidery right in your own home. <br> <br>Whereas early home embroidery machines were limited to simple designs and poor stitch quality, modern machines can stitch out intricate designs with stunning detail. Built-in computers and LCD touch screens make it easy to edit designs, adjust colors, and get the perfect placement. <br> <br>Features like automatic thread trimmers, multiple hoops and frames, and embroidery editing software are now standard. Wireless connectivity allows you to download designs and update machine software without cables. Automatic thread tension and presser foot pressure take the guesswork out of setup. <br> <br>Modern embroidery machines range from inexpensive starter models under $500 to advanced multi-need professional machines costing several thousand dollars. Most hobbyists opt for a mid-range model in the $800 to $1500 range which offers versatility for both embroidery and regular sewing. <br> <br>With a home embroidery machine, crafters and home decorating enthusiasts can add a personal touch to clothing, hats, towels, bags, quilts, and more. It’s an accessible craft that allows you to embellish your projects with custom monograms, names, motifs, and unique designs. The embroidery possibilities are endless. <br> <br>Industrial Machines <br> <br>Industrial embroidery machines are designed for large-scale commercial production and maximum efficiency. Unlike home embroidery machines, industrial machines are faster, more durable, and capable of embroidering much larger areas. <br> <br>The biggest difference between industrial and home embroidery machines is speed. Industrial machines can stitch at speeds from 700 to 1500 stitches per minute. This allows companies to produce embroidered items much faster. Some industrial machines have multiple heads, allowing them to work on multiple products at once. For example, a 15-head embroidery machine can embroider 15 shirts simultaneously. <br> <br>Industrial embroidery machines have much larger embroidery fields than home machines. The embroidery field is the maximum hoop size the machine can accommodate. Home embroidery machine hoops are usually 6×10 inches to 8×12 inches. Industrial machines can embroider fields from 16×20 inches up to 28×40 inches. This expanded area allows them to embroider large designs, jacket backs, sheets, and other oversized items impossible on a home machine. <br> <br>These machines are built for durability, capable of running 24/7 in production environments. They use heavy-duty parts including industrial-grade needles, motors, and internal components. Most industrial embroidery machines come with a variety of convenient features for commercial work, like automatic thread trimmers, auto oiling systems, large thread capacities, and enhanced computer connectivity. <br> <br>Advanced capabilities of industrial embroidery machines include specialized techniques like 3D puff embroidery, sequin embroidery, chenille embroidery, applique, and more. The computerized software allows for editing and customization of designs as well as integration with other equipment. Overall, industrial embroidery machines offer power, speed, reliability and versatility for professional embroidery work. <br> <br>Embroidery Machine Software <br> <br>One of the biggest evolutions in embroidery has been in design software. Early embroidery machines only allowed stitching preset designs. To stitch a new design, it had to be digitized on a computer with CAD-like software and transferred to the machine via a memory card or cable. <br> <br>The first home computerized embroidery machines in the late 1980s and early 1990s came with limited built-in design capabilities. Users could edit preset designs and create simple lettering and shapes. <br> <br>In the mid-1990s, more advanced design software emerged for home computers. Programs like Amazing Designs allowed home embroiderers to digitize images into stitches with various tools and effects. <br> <br>Today’s embroidery software provides sophisticated editing tools like stitch splitting, color sorting, stitch angle changes, object transforms and combining designs. Popular programs used with home and industrial machines include Artista, Bernina Embroidery Software, Brother PE-Design, Husqvarna Viking Embroidery Software, Janome DigitizerMB, Pulse Ambassador and more. <br> <br>The Future <br> <br>The future of embroidery machines looks bright as the technology continues to advance rapidly. Here are some predictions for where embroidery technology is heading: <br> <br>– Higher resolution and more detail – Machines will be able to produce embroidery with increasing detail and dimension, mimicking the look of hand embroidery even more closely. <br> <br>– Faster speeds – Industrial machines are already extremely fast, but home models will catch up, allowing embroiderers to complete projects more quickly. <br> <br>– Wider embroidery fields – The size of the embroidery field will expand, allowing for bigger and more complex designs to be stitched out in one hooping. <br> <br>– More connectivity and digitization – Machines will become more connected to external software and the cloud, improving digitizing capabilities directly on the machine. <br> <br>– Increased automation – With improving AI and computer vision, machines may take on more steps of the embroidery process with less human intervention needed. <br> <br>– Specialty techniques – Machines will master specialized techniques like lace making, applique, quilting, and other effects. <br> <br>– Customization – On-demand customization and personalization will be easier than ever. <br> <br>– Lower costs – Improved manufacturing and competition will continue to lower prices and make advanced features more accessible. <br> <br>– User-friendly features – Better display screens, tutorials, troubleshooting and more intuitive controls will allow new users to get up to speed quickly. <br> <br>– More versatile uses – Embroidery will expand beyond just fabric into gifts, paper crafts, home decor, leather, and more. <br> <br>While embroidery started out as an artisan craft, machines have allowed it to become a popular hobby and industry. As technology progresses, embroidery will reach new heights in artistry and application. Both professionals and home embroiderers have an exciting future ahead with more possibilities than ever. <br> <br>Conclusion <br> <br>The history of embroidery machines has been a progression from basic hand-operated tools to computerized industrial machines and everything in between. From the first sewing machines adapted to create simple stitches in the 1800s to the programmable home embroidery machines of today, the capabilities and convenience have vastly improved. <br> <br>The development of computerized embroidery took the craft to a new level, enabling multi-color designs and precision stitching. While industrial machines continue pushing the boundaries of speed and capabilities, home embroidery machines now offer hobbyists and small business owners the chance to embellish garments and crafts with detailed embroidery designs at the touch of a button. <br> <br>[a]https%3A%2F%2Fwww.digitize4life.com[/a]
Advanced Systemcare 17 key
Advanced Systemcare 17 key is a software suite developed by IObit that aims to optimize, clean, and secure your computer. It is designed to improve system performance, fix various issues, and enhance overall system stability. Get Activated Software Free: [a]https%3A%2F%2Fdriver-booster-11-key.com%2Fadvanced-systemcare-17-key%2F[/a]
Buy Smile Face Iphone Cases
Various smiley faces grouped in patterns, a single giant happy face design, or variations in facial emotions like winking; laughing, or putting out the tongue may all be seen on Smile Face Iphone Cases. These patterns can provide the iPhone cover with a humorous and enjoyable touch. Users may select a case that best suits their tastes or personal style from a broad selection of color options available for these cases. Yellow is a common hue for smiley face iPhone covers. Vibrant colors are also used to create eye-catching designs.